Posture. Proper posture is important in helping you look and feel good. I can't say that I agree that if you have good posture you will look 10lbs lighter, but what I can agree with is that you will look much better. Taller, more confident and ultimately, you will look better in your clothes.
I came upon this excerpt from
A Guide to Elegance, by Genevieve A Dariaux.
When a woman is trying on clothes, she almost always holds herself beautifully erect in front of the dressing room mirrors. If afterward she hollows her chest and lets her entire body slump, she should not be surprised to find that her new dress does not look at all as chic as it did when she tried it on in the shop.
I couldn't agree more.
 |
J Crew model hunched shoulders - increasingly popular to see models in awkward poses
|
The way you carry yourself, the way you walk, sit, stand and move can make or break your look! No one will remember your killer outfit if you carry yourself poorly.
 |
| Audrey Hepburn |
Audrey Hepburn is a classic example of good posture. Which was attributed to her ballet background.
I have recently discovered that my posture wasn't perfect (gasp!) and the small adjustments that I have been instructed to make have already made a HUGE difference. (I never thought I'd be told to "fill my pants", especially at my age. Don't worry - just keep reading.) It's no easy task, but I am definitely more aware of how I sit and stand. This advice was given to me by Kinesiologist Michelle McCalpin from the Live Well Centre in Kingston. I thought it would be a good idea to have her share some words or wisdom on the subject. So here it is!
Getting Straight and Strong With Posture
If there were one thing you could do to look taller, have a more defined rear end, while strengthening your core with barely any work, wouldn’t we all do it? Well here it is: proper posture! Correct posture is not just important so that we appear tall (yet let’s face it, who wants to look like the little old lady with the hunch back)? By standing and sitting in correct posture we are aligning our body to form our natural spinal curvature to keep our back safe and have minimal tension in our upper back, shoulders and neck. Our head is right on top of our shoulders, our rib cage is directly over our pelvis and our bum is apparent. And let’s face it, we look good in our clothes!
Posture really is where it all starts. For strengthening your core, relieving back stress or tension, to “filling our pants” with our newly defined rear, it is essential for everyone to ensure they are standing and sitting correctly!
So how do we get this correct posture?
5 Quick and Easy Steps to Align Yourself and Get Your Core Muscles and Pelvic Floor Firing All Day, Everyday.
Standing:
- Feel for your front ribs, right below your chest. Now imagine yourself drawing a line down from the ribs to the floor. Would you hit your hips along the way? Our rib cage should be directly stacked on top of our pelvis, and therefore we should be able to ever so slightly tell that our front ribs are anterior to our hips. If they are not, imagine someone is pulling a string out from your chest, until they are in front of your hips.
- We should all have a noticeable bum! Do you have loose material in your pants where your bum should be? Just with movement through your hips (not your torso) perform a pelvic tilt as if someone tied a string to your tailbone and pulled up on it. Or how I like to say it, “Fill your pants”. You should notice an instant perkiness in your rear. This is how we should stand! Not with a tucked under bum that leaves us with bagginess in our pants!
- After performing steps 1 and 2, you should notice your head and shoulders fall into place. To make sure of this, look in a mirror. Our ears should be right over top of our shoulders and we should not feel like our shoulders are rolling forward. You should also feel that your weight is distributed over the balls and arches of your feet, not all on your toes or heels. If your weight is not in the middle of your feet, adjust accordingly.
- Breathe properly! Place your hands on your side ribs nice and firmly. As you inhale, think about your ribs expanding and pushing your hands out. Therefore as you exhale your ribs should go back in. Don’t be afraid to push the ribs back in with your hands to help with the movement. Do not breathe with your chest! This is just creating upper back, shoulder and neck stress.
Good Posture

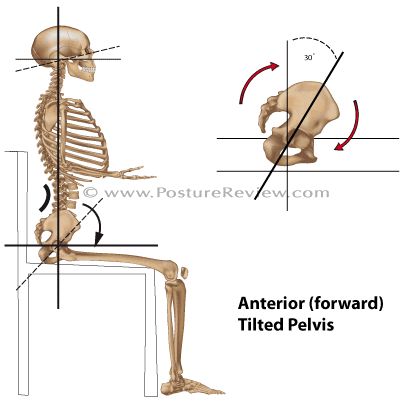
Sitting:
With how much on average we sit as a society, it is
crucial that we sit properly and safely to not put any extra stress on our lower backs, upper backs and shoulders. Just like when we are standing, we should sit with a pelvic tilt that ensures we have our natural spinal curve through the lower back. However it is so common to sit in the tucked under position, which forces the lower back to round, shoulders to roll forward, head to lean forward and therefore much stress on the shoulders and neck. Sound familiar?
5. To ensure you are sitting in the proper position roll a towel, bed sheet, or even article of clothing so it forms a long tube shape. Place this at the back of your seat. Sit on the material with the “big” part of your bum. You will notice it creates a wedge and props your bum up high, forcing the pelvic tilt we always want to have. Now try to lean back? Not only does this wedge help with proper pelvic alignment but it also forces us to lean slightly forward which you will notice makes it very uncomfortable to lean back and slouch! Grab something to wedge underneath you and notice the difference it will make!!
Proper Sitting Posture
It just takes 5 simple steps to get yourself aligned correctly, strengthening core muscles, protecting your back, looking taller and filling your jeans with your more defined bum.
For more information about posture or to make an appointment with me please email me at livewellexercise@cogeco.net or contact The Live Well Centre at (613) 549-0866
Now, sit up and stop slouching! Thanks Michelle.


